Facebook fan pages feature a tool that allows users to create and schedule several posts in one day, making updates easy and more convenient. This tool is especially useful for advertising agencies and for those who promote or hold multiple events throughout the year. Want to learn how to schedule a Facebook post? Simply follow the four steps listed below.
Step 1: Go to your Facebook fan page
Visit your fan page by going to your news feed at facebook.com. Click your fan page under “Favorites” on the left column of your feed.

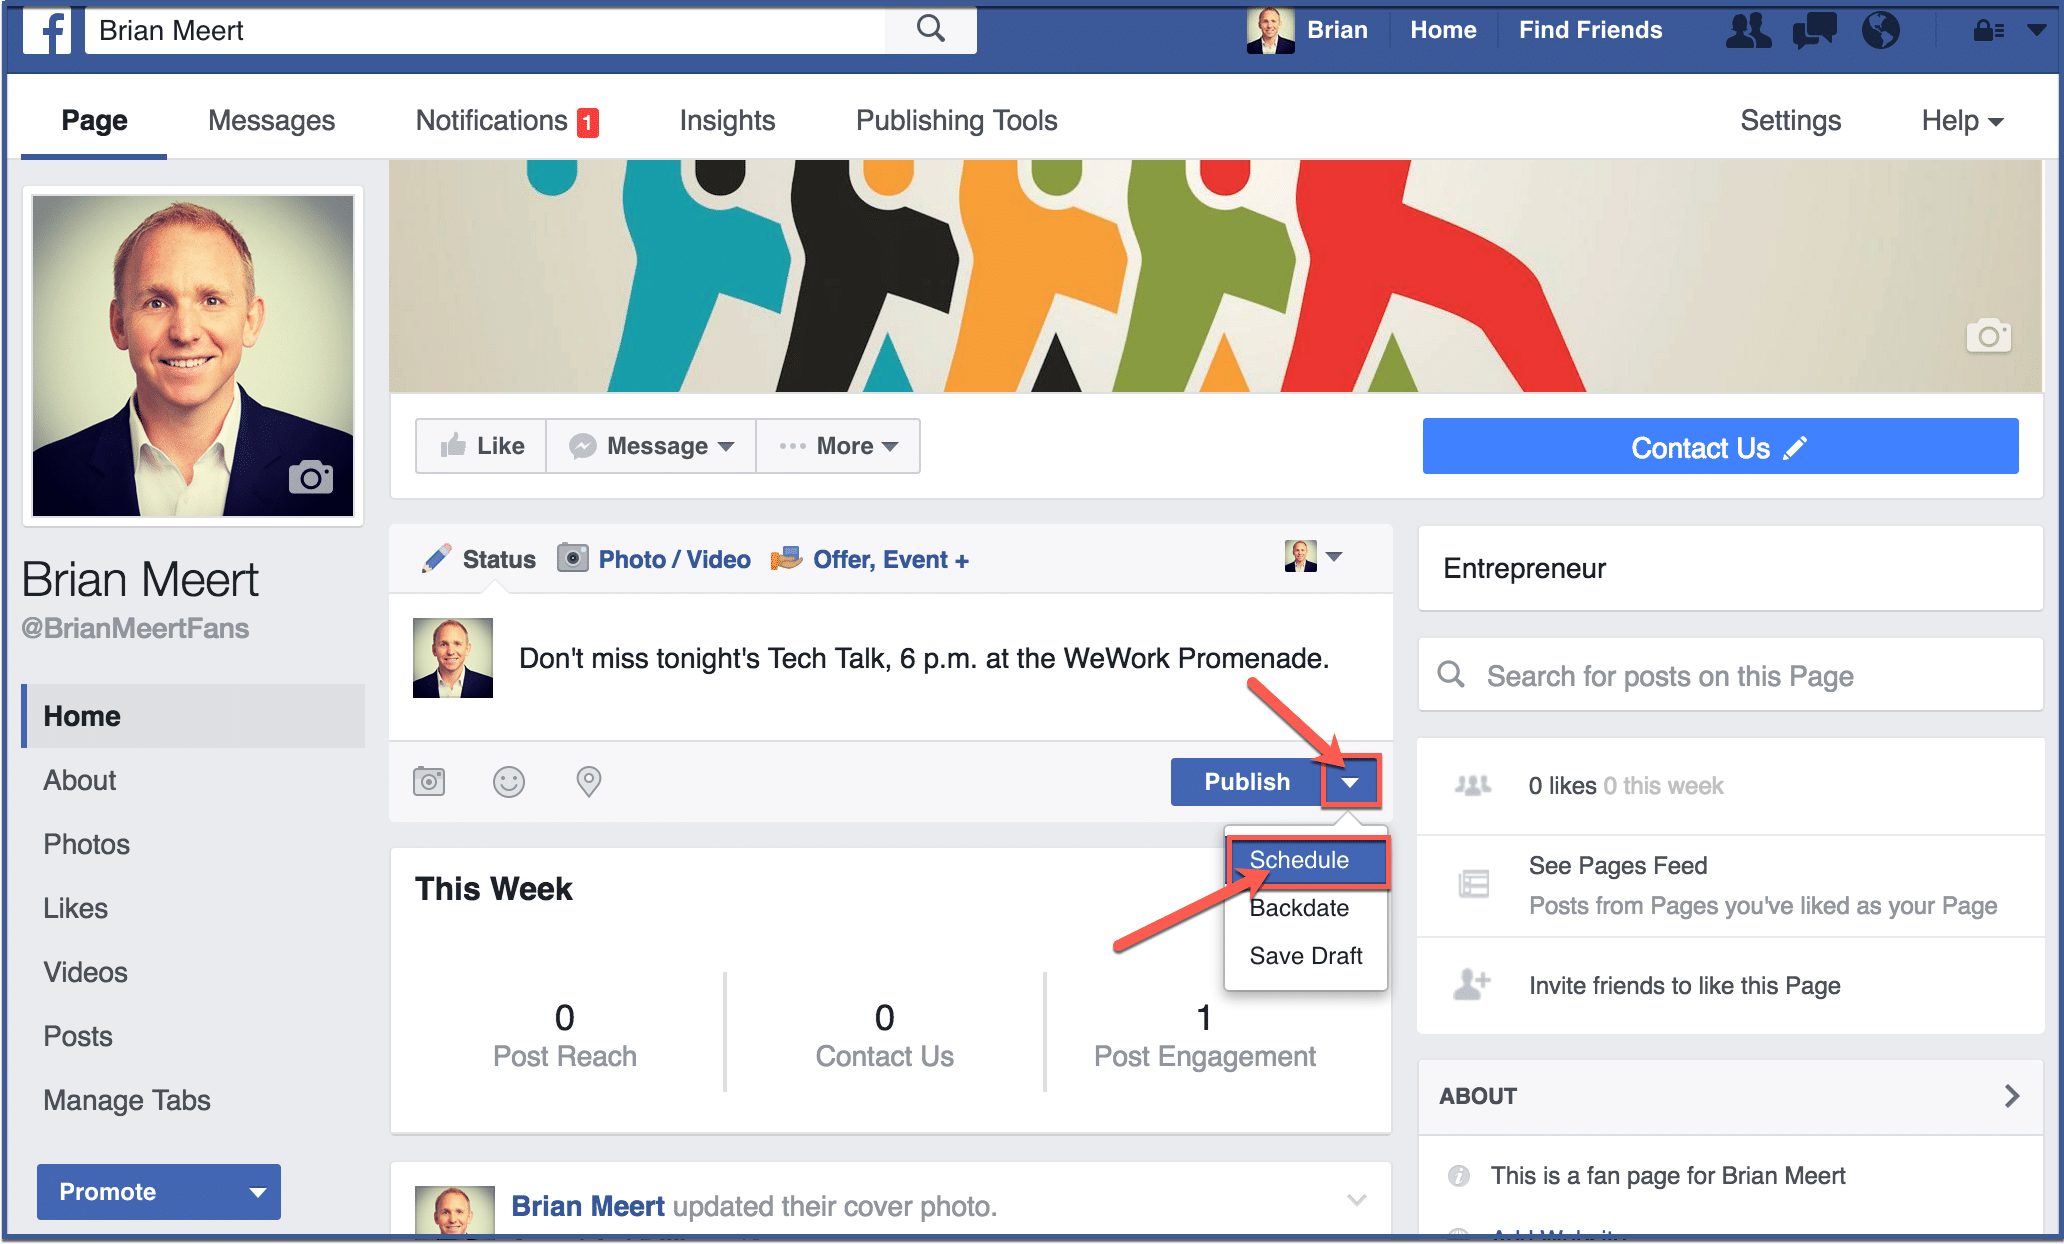
Step 2: Schedule your post
Click the upside down triangle next to “Publish“. Doing so will expand the drop down menu to show more options. Click “Schedule“.
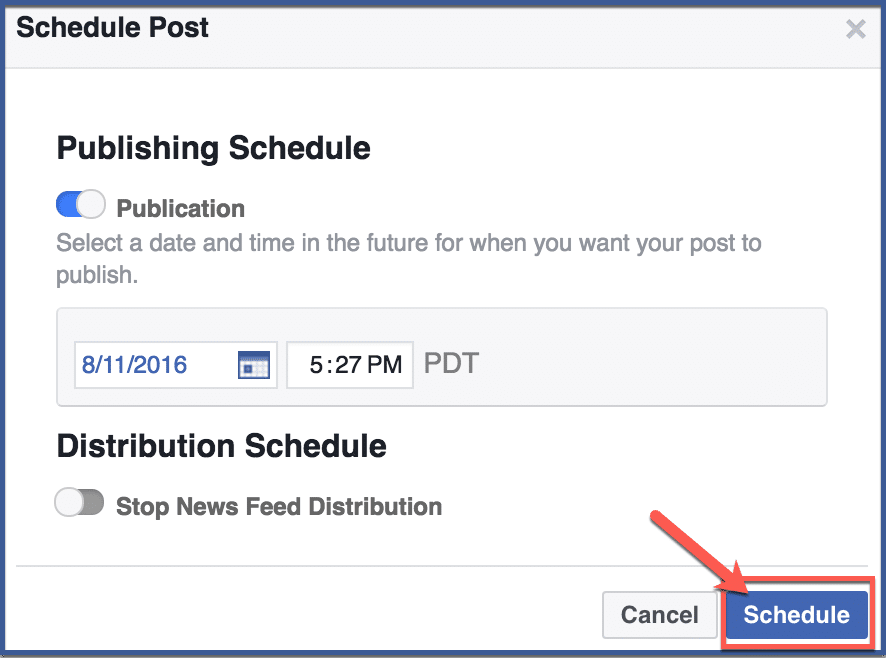
Step 3: Pick a schedule
Choose a time and date when you want Facebook to post your scheduled post. Then click “Schedule” once you’re done.
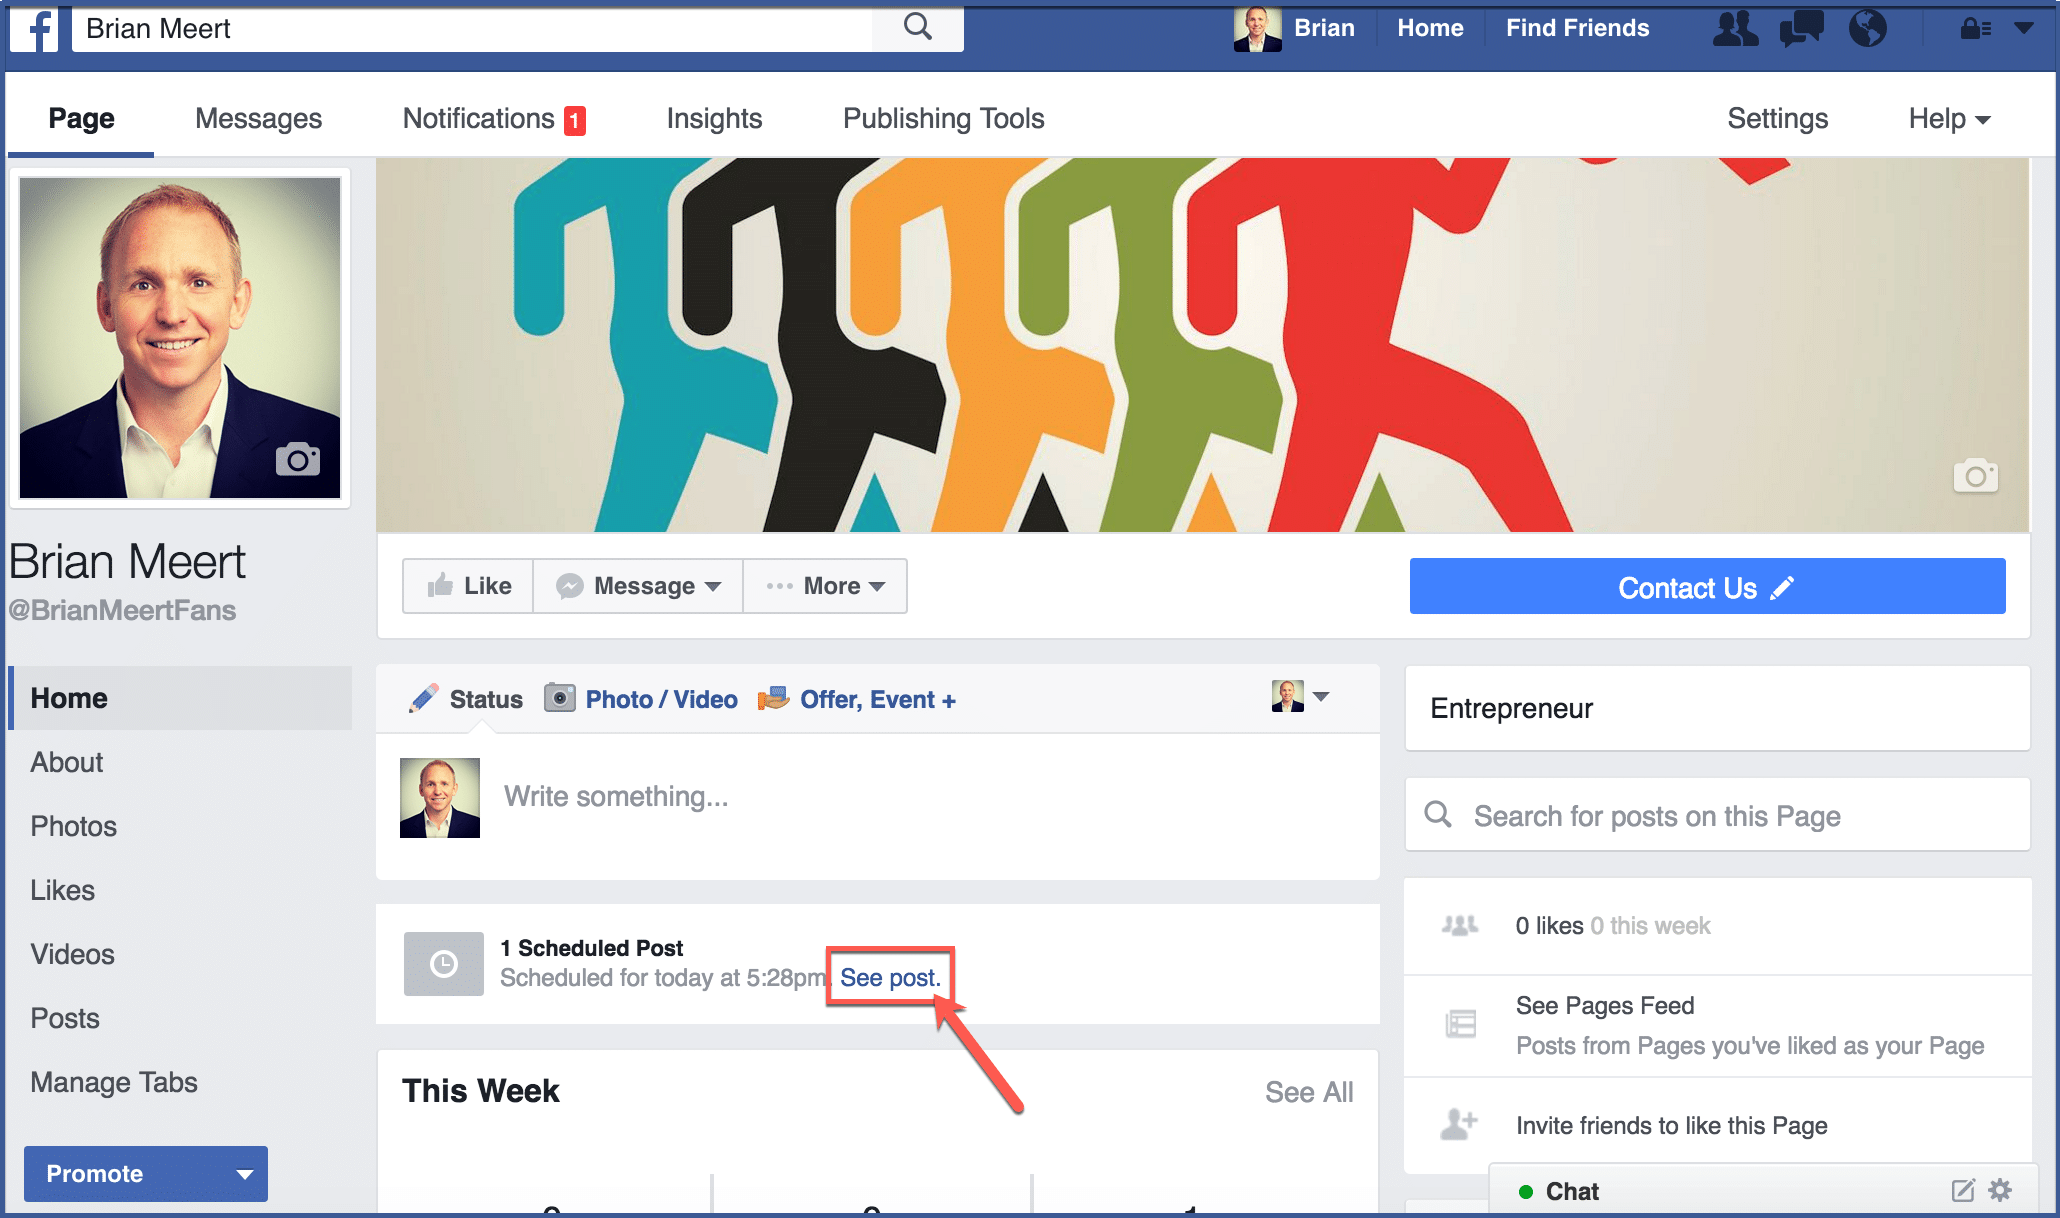
Step 4: Double check
Double check your scheduled post by clicking “see post“. Although this is not a required step, double checking ensures your post is scheduled and ready to go.
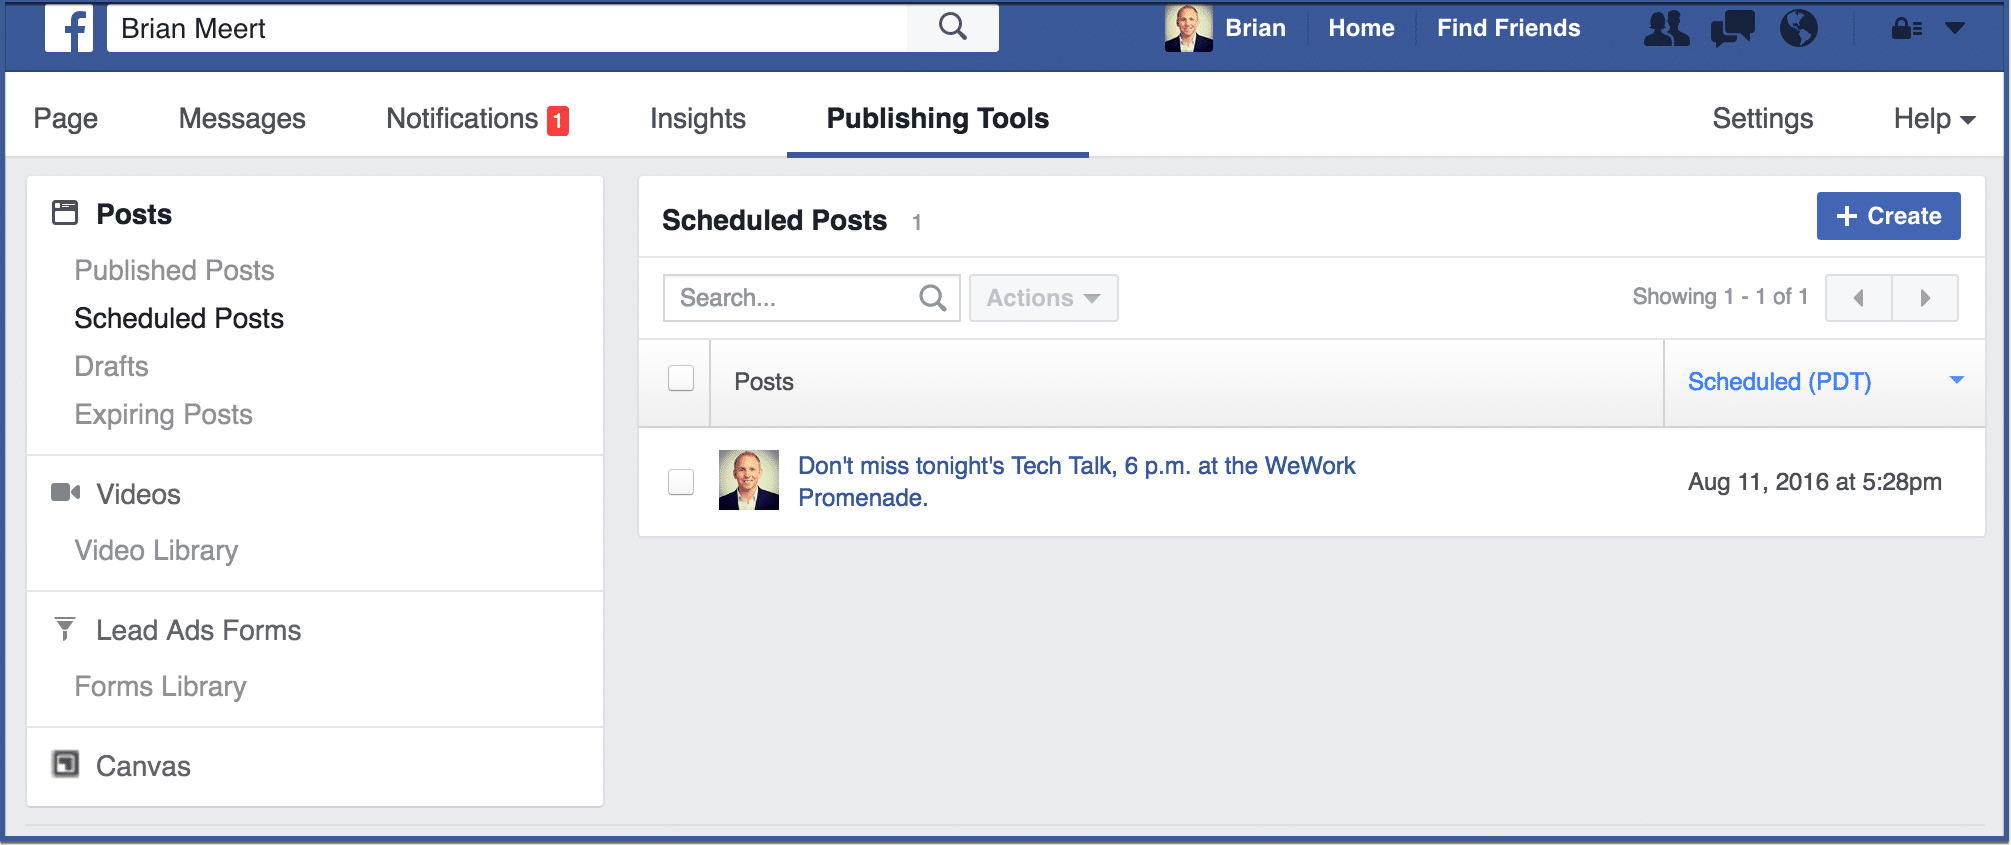
Step 5: You’re done!
You can view your scheduled post here. If it doesn’t appear on the page, refresh until it does.
How to schedule a Facebook post using a third-party scheduling tool
There are many third-party scheduling tools available, such as Hootsuite and Buffer. These tools provide a range of features to help with social media management, such as scheduling posts across different platforms, tracking post-performance, and collaborating with others.
To schedule a Facebook post using a third-party scheduling tool, you’ll need to create an account and connect your Facebook Page. Once you’ve done that, you can follow the instructions in the tool to schedule your posts.
Benefits of Scheduling Posts on Facebook
Scheduling posts on Facebook offers a range of valuable benefits that can greatly enhance your social media strategy and online presence. Here are some of the key advantages:
1. Time Efficiency
Scheduling posts allows you to allocate a specific block of time to create and schedule content in advance. This eliminates the need for frequent interruptions throughout the day to post in real-time, giving you more time to focus on other essential tasks.
2. Consistency
Consistency is crucial in maintaining audience engagement and building a loyal following. By scheduling posts, you can ensure a steady stream of content, even during busy periods or when you’re unable to access your social media accounts.
3. Audience Reach
Different time zones can be a challenge when trying to connect with a global audience. Scheduling posts enables you to post at optimal times for various time zones, maximizing your reach and engagement across different regions.
4. Strategic Planning
Scheduling empowers you to plan your content in advance, aligning it with events, promotions, or product launches. This strategic approach ensures that your posts are timely and relevant, enhancing their impact.
5. Improved Analytics
Scheduling posts allows you to space out your content and avoid overwhelming your audience with multiple posts at once. This can lead to more accurate insights from post analytics as individual posts receive the attention they deserve.
Best Practices for Scheduling Posts on Facebook
Use Scheduling Tools
Facebook offers its scheduling feature, but there are also third-party scheduling tools like Buffer, Hootsuite, and Later that provide additional features and analytics. Explore these options to find the one that best suits your needs.
Customize Content for Each Platform
If you’re sharing content across multiple social media platforms, tailor your posts for each one. What works on Facebook may not work on Twitter or Instagram. Adapt your content to match the tone and style of each platform.
Craft Engaging Headlines
Your post’s headline is the first thing users see. Make it compelling and attention-grabbing. Use action verbs, ask questions, or create a sense of urgency to encourage clicks.
Use Visuals Wisely
Images and videos are eye-catching and can significantly boost engagement. Use high-quality visuals that relate to your content. Ensure they meet Facebook’s image and video guidelines.
Test Different Posting Times
Don’t be afraid to experiment with posting times. Try posting at different times and on different days to see when your audience is most responsive. Facebook Insights can help you analyze post-performance.
Write Captivating Captions
Your captions should complement your visuals and provide context or a call to action. Keep them concise, and ensure they enhance the user’s understanding of the post.
Engage with Your Audience
Scheduling posts doesn’t mean you should set and forget. Be active and engage with your audience by promptly responding to comments and messages. This fosters a sense of community and trust.
Final Words
The option to schedule Facebook posts is a strong tool for managing Facebook posts. It’s not just about making your content plan easier. You’re getting something important – a way to save time, keep things steady, and connect with more people.
Whether you’re an individual, a small business, or a seasoned marketer, scheduling Facebook posts lets you speak clearly, connect genuinely, and matter on people’s feeds. So, use this helpful feature, tap into its potential, and improve your social media skills by becoming great at scheduling Facebook posts.
FAQs
What is a scheduled Facebook post?
A scheduled Facebook post is a post that you create and schedule to be published at a later date and time. This can be helpful if you want to make sure that your content is seen by your audience when they are most likely to be online.
Why Should I Schedule Facebook Posts?
Scheduling Facebook posts offers convenience and efficiency. It allows you to plan and prepare content in advance, ensuring consistent updates even when you’re not online. This can save you time and help you maintain an active online presence.
Do Scheduling Tools Cost Money?
Facebook’s built-in scheduling feature is free to use. However, if you’re looking for more advanced scheduling options, analytics, and the ability to manage multiple social media platforms, third-party scheduling tools like Buffer, Hootsuite, or Later offer both free and paid plans with varying features.
Can I Edit a Scheduled Facebook Post?
Yes, you can edit a scheduled Facebook post before it’s published. If you realize you need to make changes, revisit the “Scheduled Posts” section in Facebook’s Publishing Tools, locate the post, and click the “Edit” option.
How many Facebook posts should I schedule?
The number of Facebook posts you should schedule depends on your audience and your goals. A good rule of thumb is to schedule a few posts per day, but you may need to adjust this based on your results.
