In the fast-paced world of digital marketing, the capability to monitor and assess user interactions holds significant influence. Meet Google Tag Manager (GTM), a flexible and potent tool that grants you direct oversight over tracking, eliminating the necessity for intricate code setup.
This guide is designed to unravel the procedure of establishing a Google Tag Manager account, enabling you to manage your website’s tracking efforts efficiently and enhance your data-based decision-making process.
What is Google Tag Manager?
Google Tag Manager is a user-friendly and robust platform that simplifies the process of managing various tracking codes on your website.
With Google Tag Manager, you can efficiently add, update, and organize tags without the need for manual code implementation. Tags are snippets of code that track user interactions and gather valuable data for analytics, marketing, and other purposes.
By centralizing tag management, Google Tag Manager empowers you to streamline your digital tracking efforts, ensuring accurate data collection and informed decision-making.
Whether you’re a seasoned marketer or new to the digital landscape, Google Tag Manager provides a convenient and effective solution to enhance your website’s tracking capabilities.
Why use Google Tag Manager?
Using Google Tag Manager offers a multitude of benefits that can significantly streamline your digital tracking endeavors.
Firstly, it eliminates the need for manual code insertion, sparing you the complexity and potential errors that come with directly editing your website’s code. This translates to quicker implementation and modification of tracking codes, saving both time and effort.
Additionally, Google Tag Manager’s intuitive interface allows you to manage multiple tags within a single platform, enhancing organization and reducing clutter.
Its centralized control also facilitates seamless collaboration between marketing and development teams, as marketers can independently manage tags without relying on developers for every update. The ability to preview and test tags before deployment ensures accuracy and minimizes potential disruptions to your website.
Furthermore, Google Tag Manager’s compatibility with various third-party tools enables you to effortlessly integrate a range of tracking codes, from analytics to conversion tracking, all in one place.
In essence, Google Tag Manager empowers you to wield precise control over your website’s tracking, enhancing data accuracy, operational efficiency, and overall digital marketing success.
How to create a Google Tag Manager account?
If you want to configure tags without the aid of a developer, then you might benefit from Google Tag Manager, a tag management system that you can use to quickly and easily update tags and code snippets on your website or mobile app. Many successful businesses are using this system such as airbnb, Dafiti, and InsureandGo.
To create your own Google Tag Manager account, follow the steps below:
Step 1: Sign in
Click “Sign In” on the top right corner of the page.

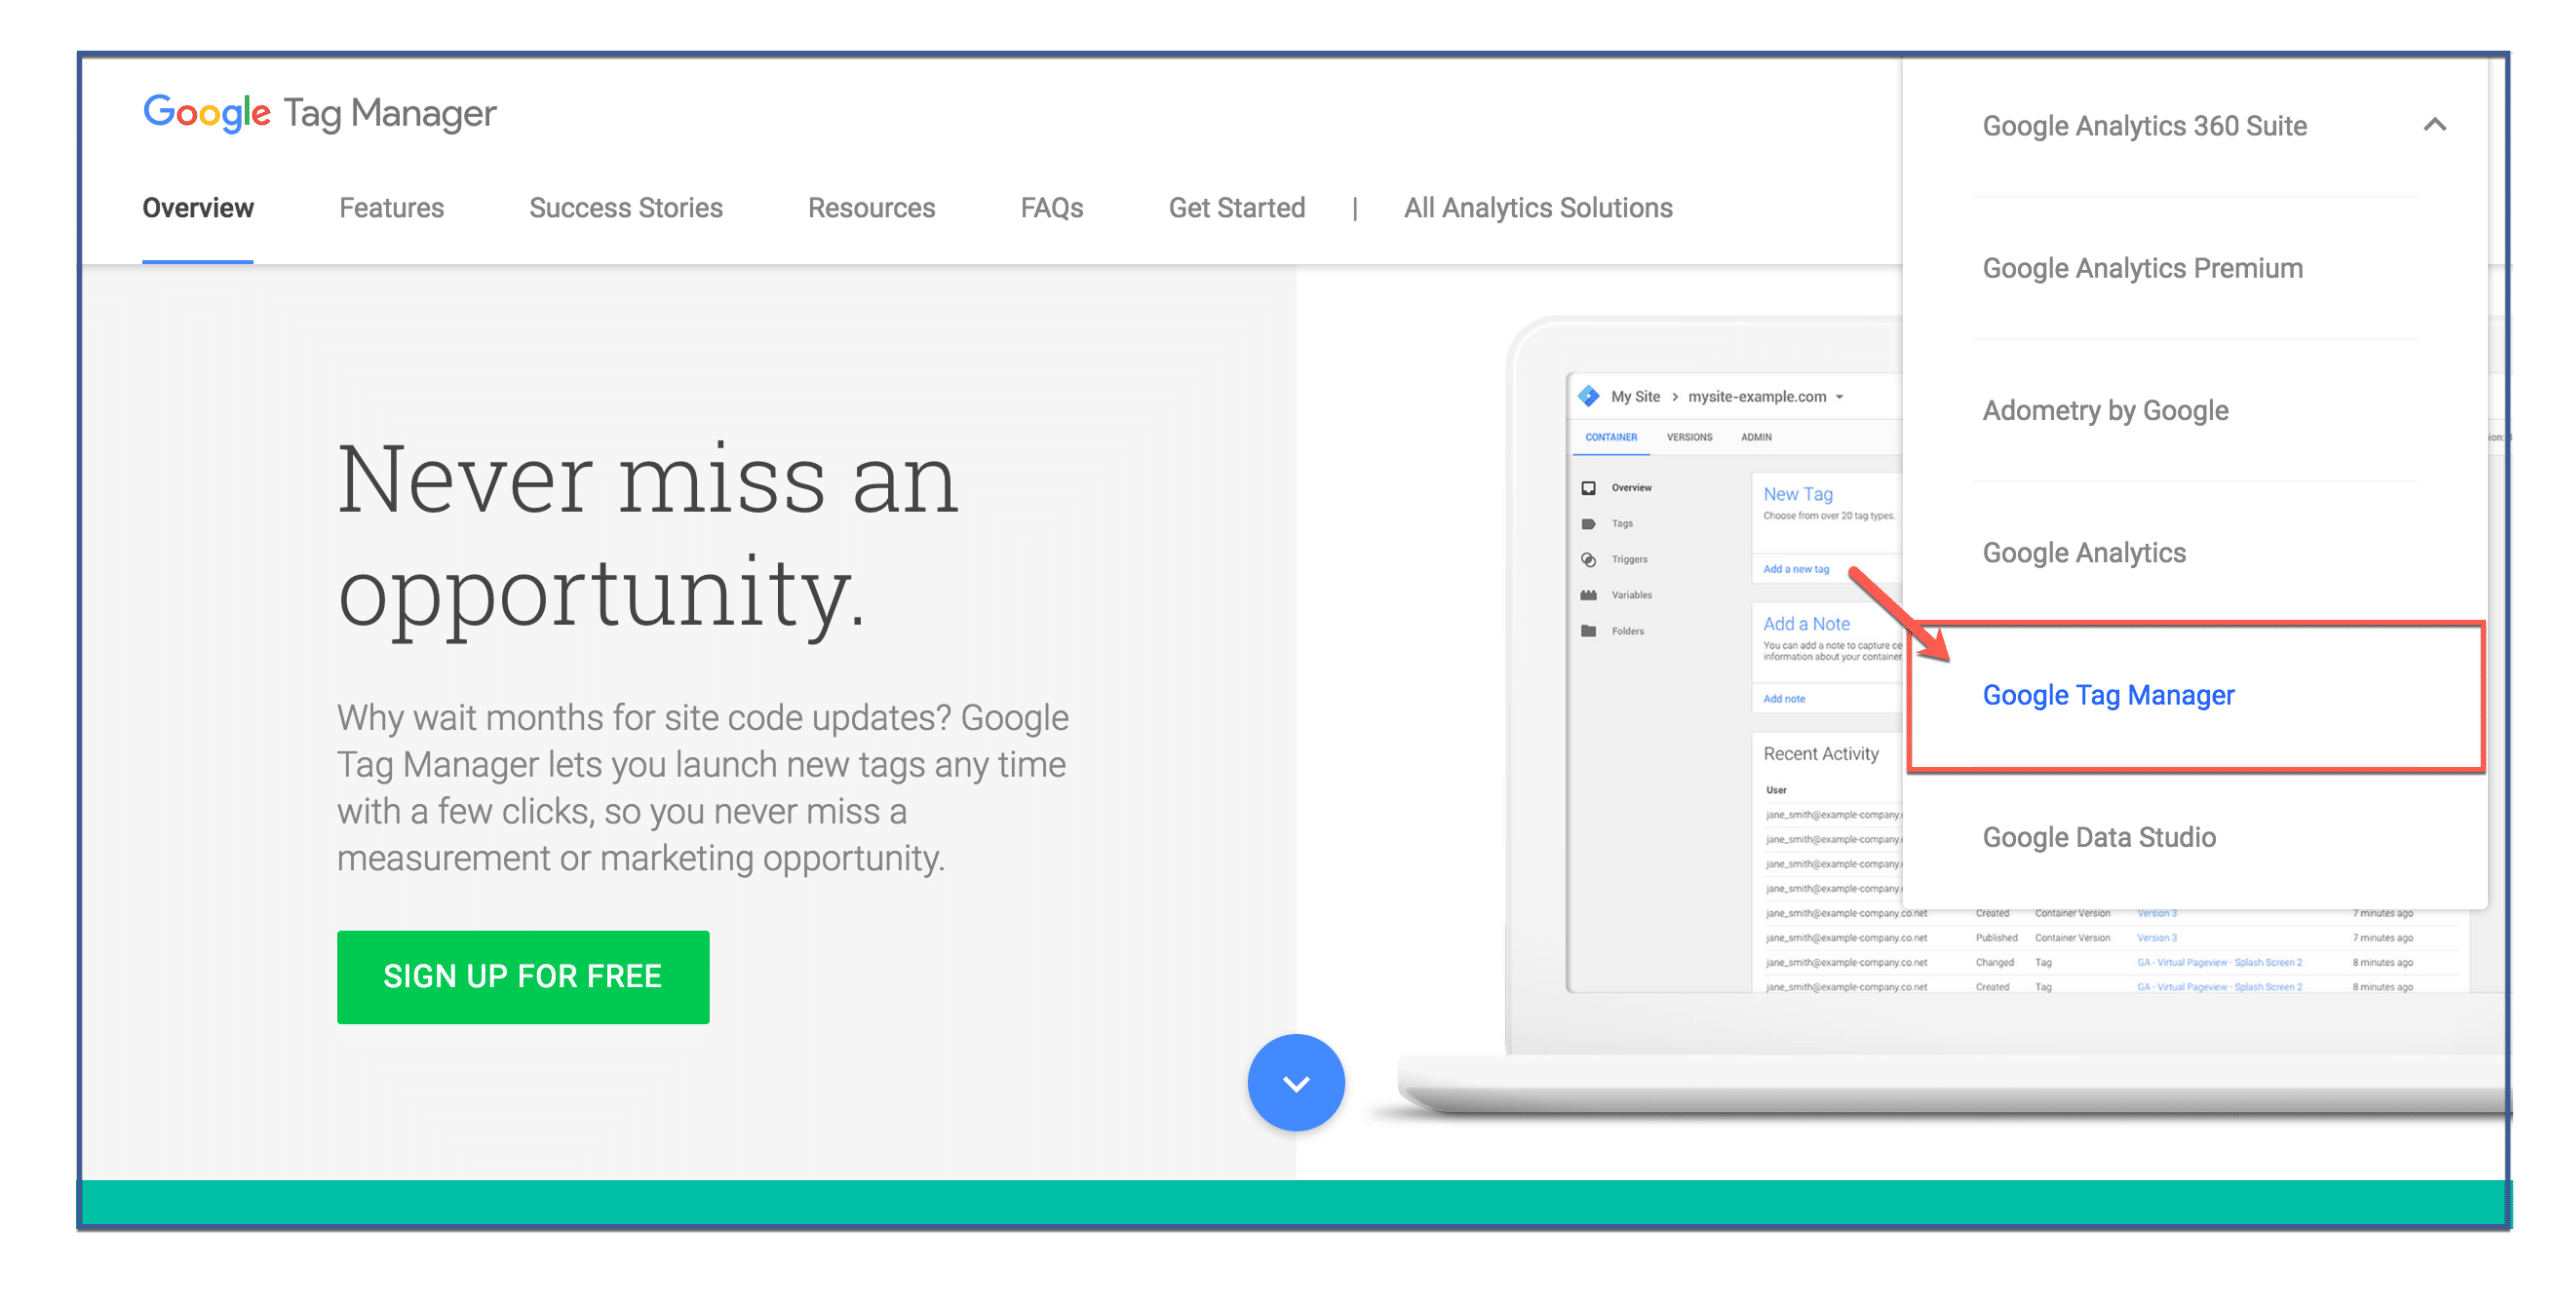
Step 2: Click “Google Tag Manager”
Click “Google Tag Manager,” the fifth option presented on the drop down menu.
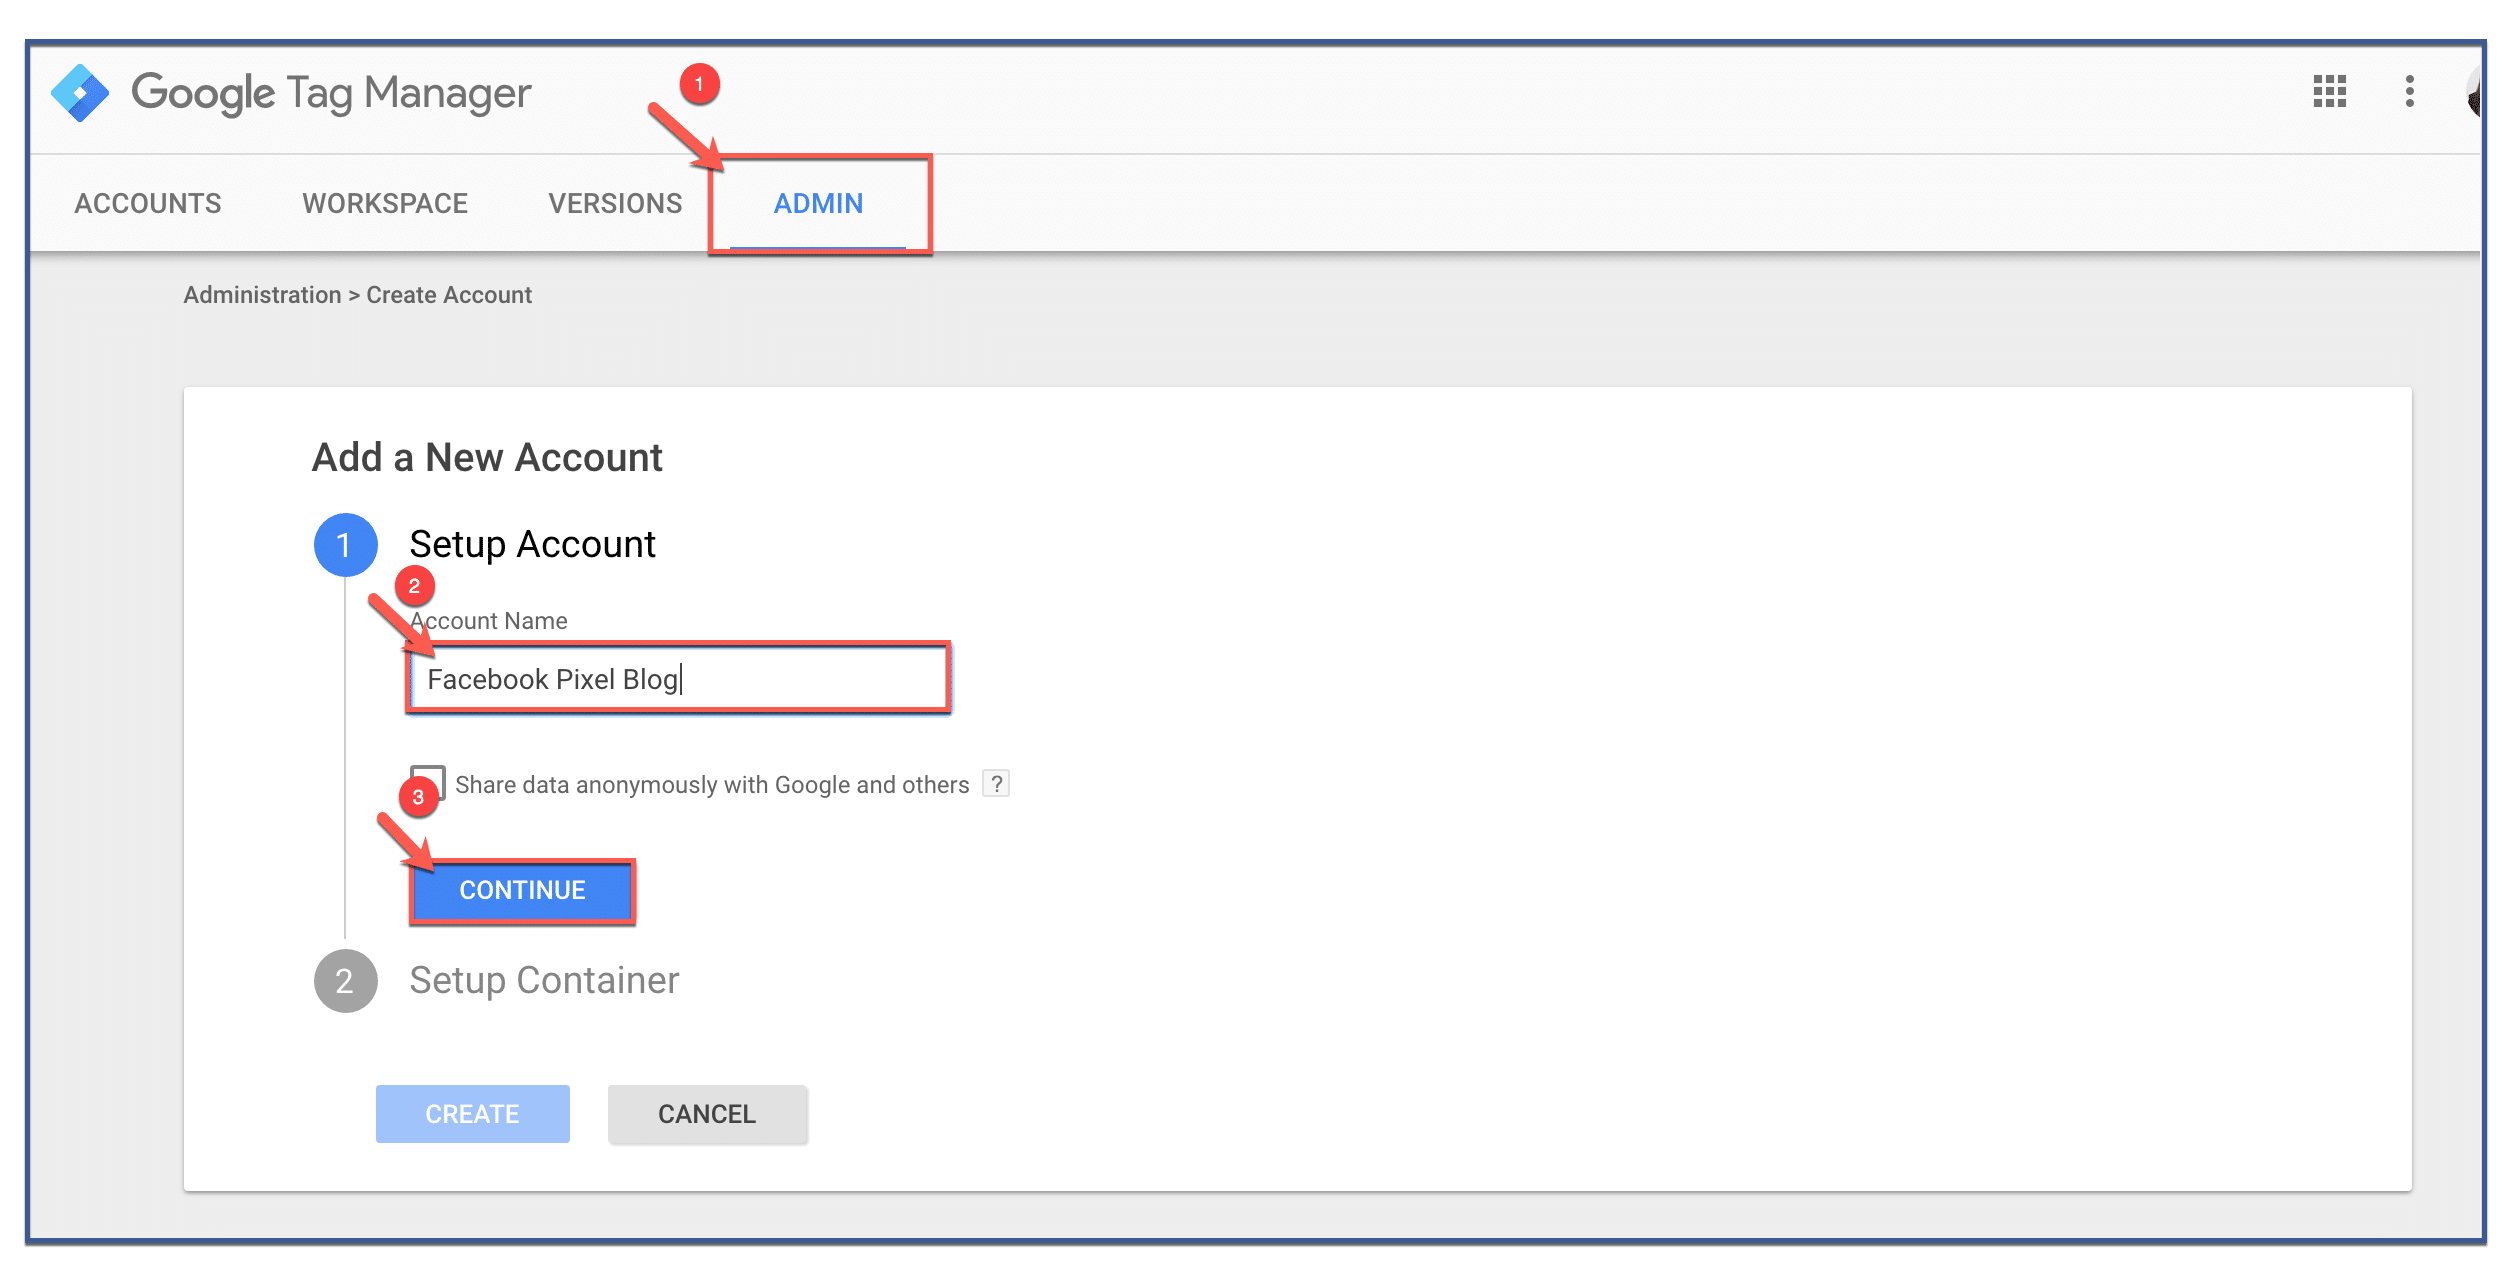
Step 3: Add a new account
Go to “Admin” to add a new account. Create an account name then click “Continue.”
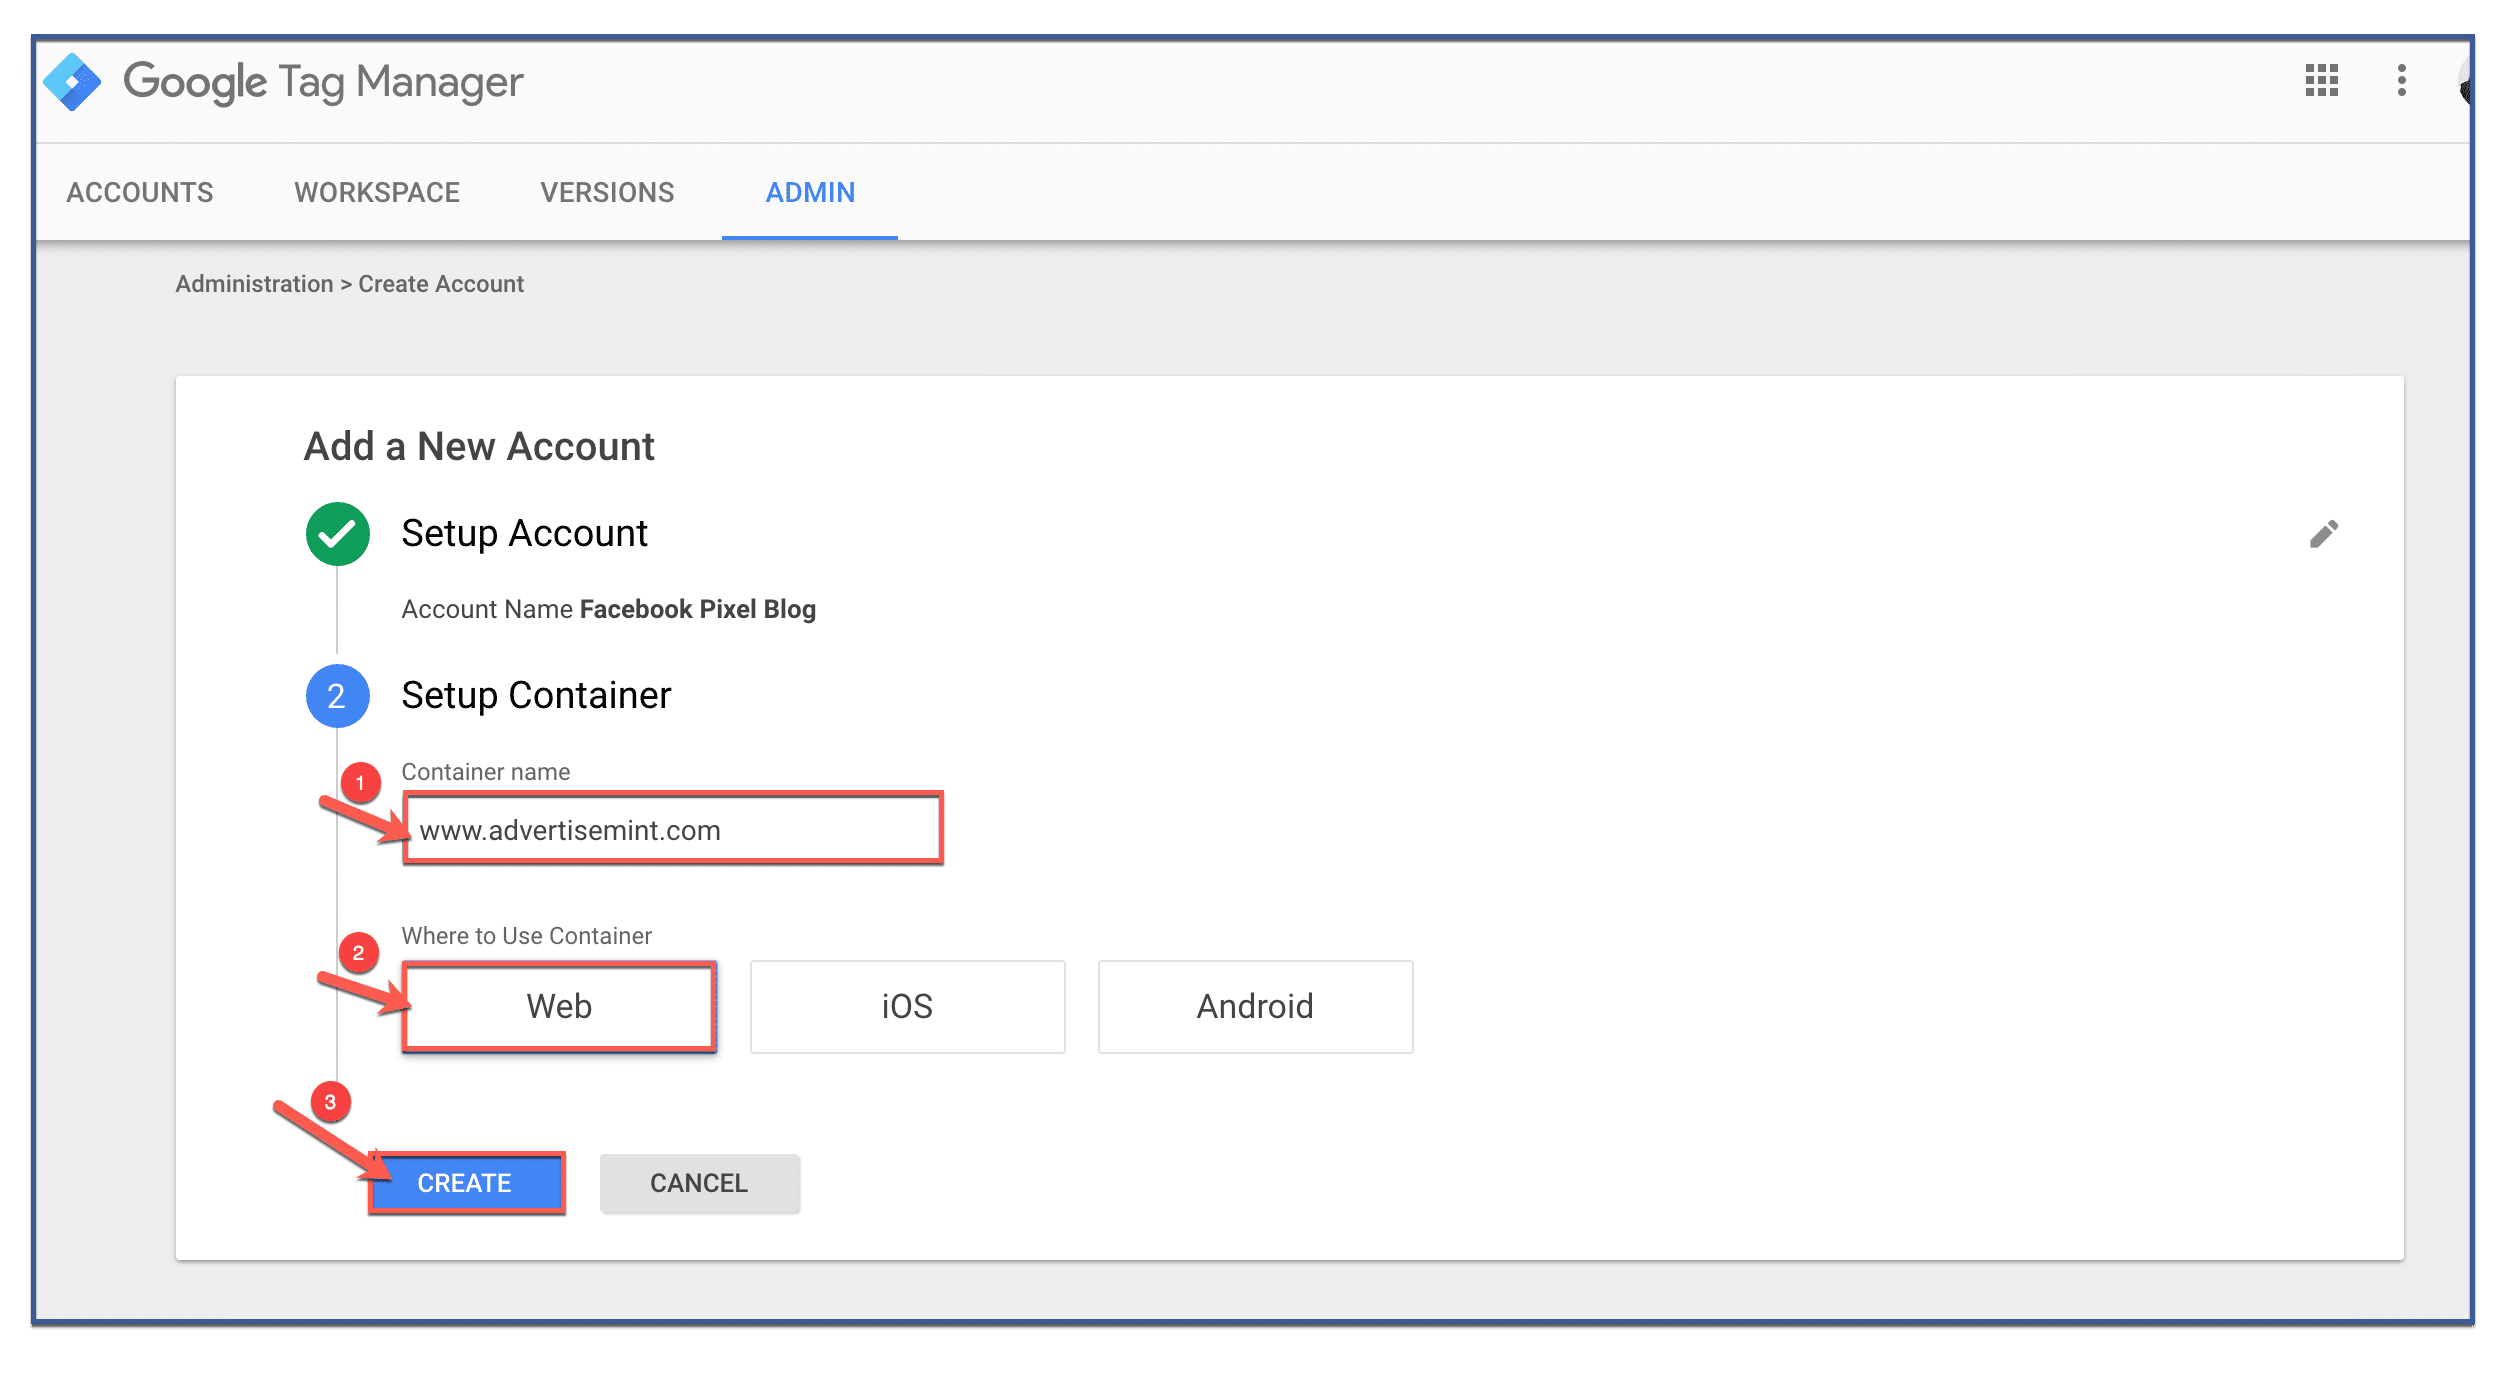
Step 4: Set up container
Give your container a name then select where you want to use your container. You have three options to choose from: web, iOS, or Android. For this example, click “Web.” Next, click “Create.”
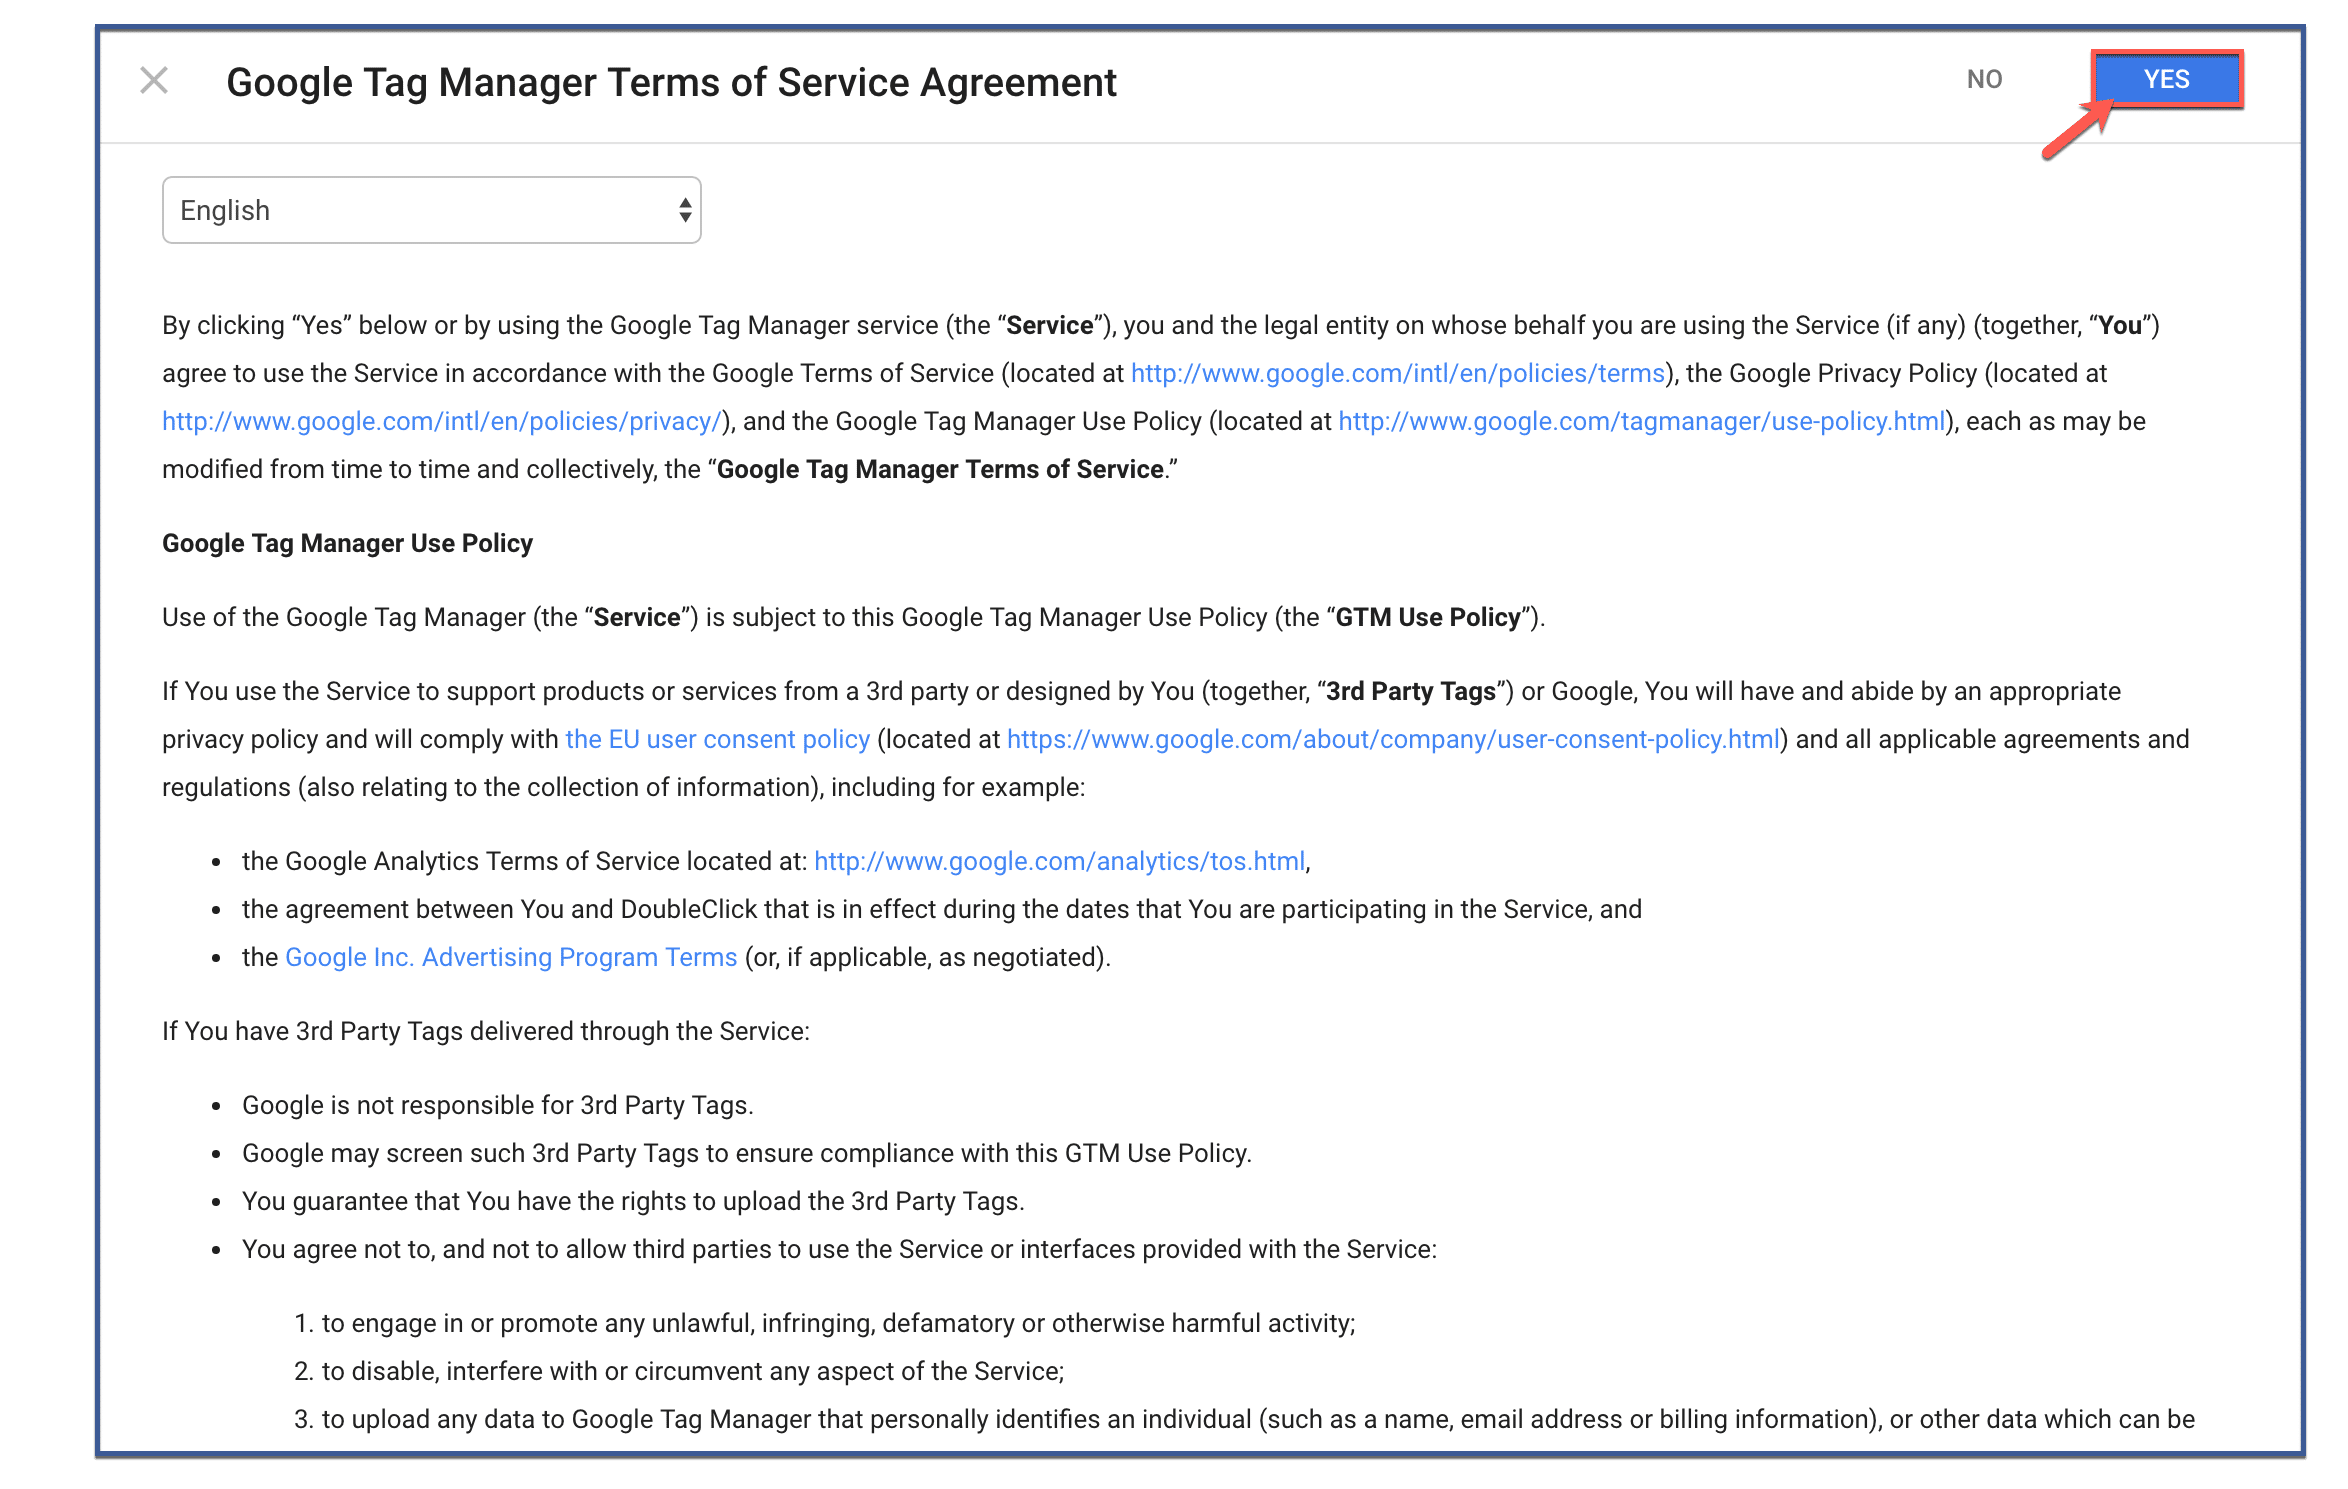
Step 5: Accept terms of agreement
Accept Google Tag Manager’s terms of agreement by clicking “Yes” on the top right corner.
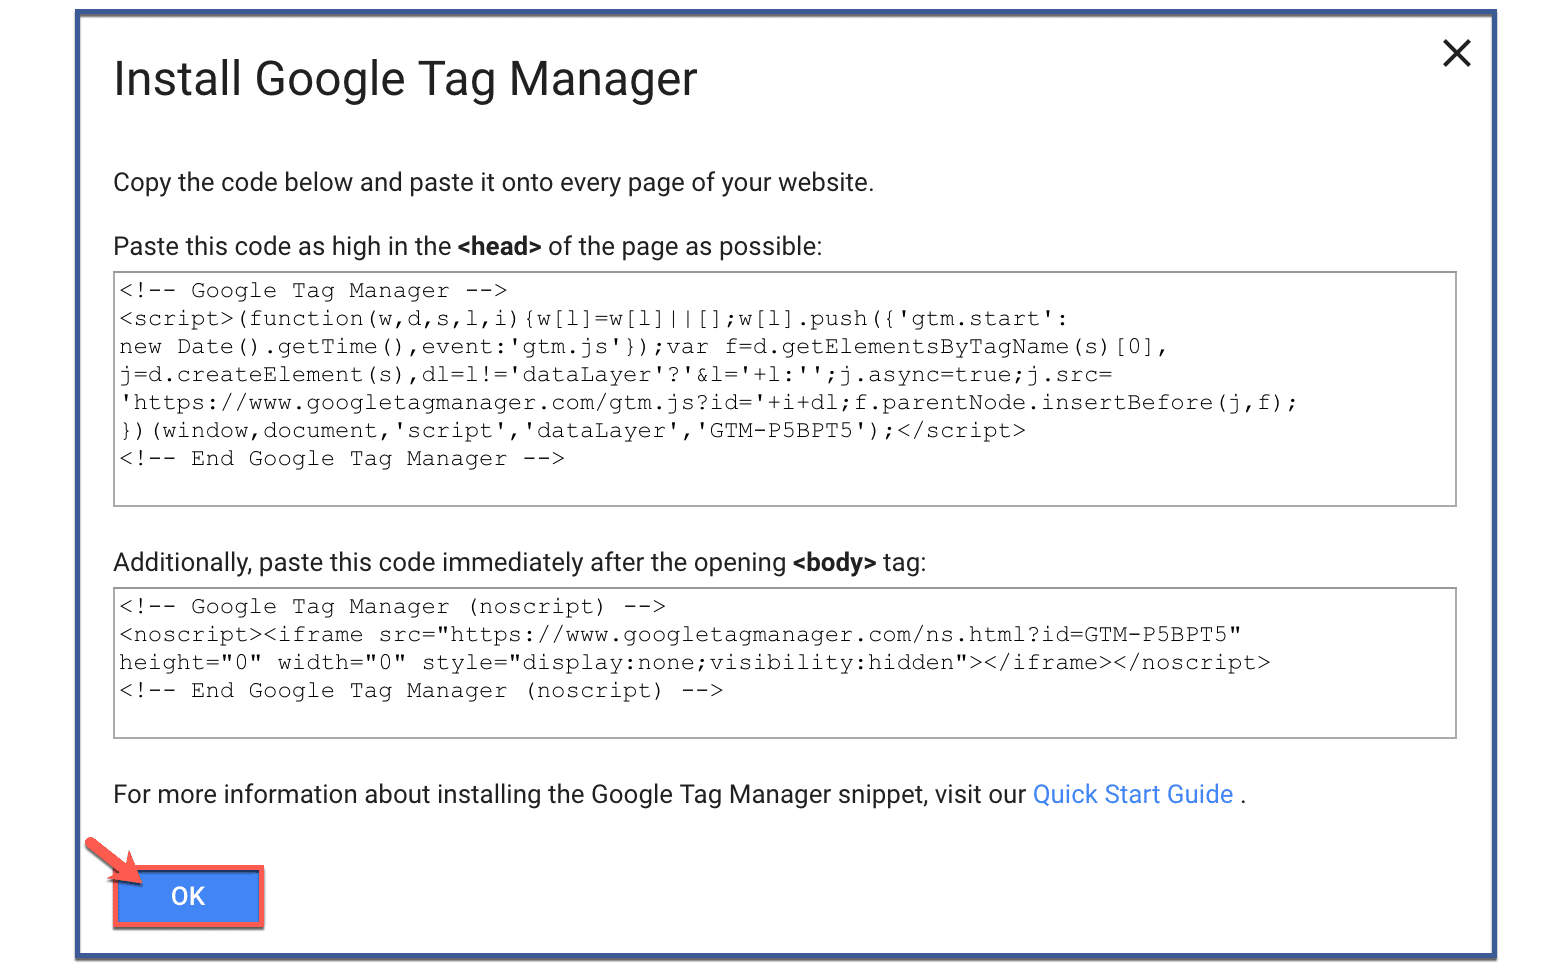
Step 6: Click “OK” to finish
Here, you see the Google Tag Manager Code which you can copy and paste into your website. If you are using the Facebook Pixel rather than the Google Tag Manager code, ignore the pop up message and click “OK” to finish.
Now that you’ve created your own Google Tag Manager account, you might be wondering how you can add your Facebook Pixel to Google Tag Manager. To learn how, read How To Install a Facebook Pixel to Google Tag Manager.
Adding Your First Tag
With your container in place, it’s time to add your first tag. Tags in GTM are snippets of code that track specific user interactions, such as pageviews, clicks, form submissions, and more. The beauty of GTM lies in its user-friendly interface, which allows you to add tags without delving into the intricacies of code.
To add a tag, select the “Tags” section within your container and click “New.” From here, you can choose from a variety of tag templates provided by GTM, including Google Analytics, Facebook Pixel, and more.
Each tag template comes with preconfigured settings that simplify the setup process. After selecting a template, you’ll need to configure the tag details, such as naming conventions, triggering conditions, and variables.
Managing Triggers and Variables
Triggers and variables are integral components of Google Tag Manager that enable you to control when and where your tags fire.
Triggers define the conditions under which a tag is activated, while variables provide dynamic data that can be utilized within your tags. For example, you can create a trigger to fire a tag when a user clicks on a specific button or lands on a particular page.
Variables, on the other hand, enhance the flexibility of your tags by allowing you to incorporate dynamic values. These values can be anything from page URLs and form field inputs to user-generated data.
By mastering the art of triggers and variables, you gain precise control over your tag deployment, ensuring that your tracking efforts are targeted and efficient.
Preview and Publish: Testing Your Configuration
Before deploying your tags to the live environment, it’s crucial to test your configuration to ensure accuracy.
Google Tag Manager offers a “Preview” mode that allows you to simulate tag firing and observe how tags interact with your website’s elements. This mode provides a real-time preview of how your tags will behave when users interact with your site.
To activate the preview mode, simply click the “Preview” button within your GTM container. This action generates a preview URL, which you’ll need to open in a separate browser tab.
As you navigate your website, the GTM interface displays valuable insights into tag firing, triggering conditions, and variable values. This simulation enables you to identify any discrepancies or issues before deploying your tags to the live environment.
Deployment and Implementation
With thorough testing completed, it’s time to deploy your configured tags to your live website. To do this, return to the GTM dashboard and click the “Submit” button within your container. This action publishes your container, making your tags live and active on your website. The tags you’ve added will now fire according to their triggering conditions, allowing you to collect valuable data that informs your digital marketing strategies.
Conclusion
In conclusion, creating a Google Tag Manager account opens the door to a world of streamlined tracking and data-driven insights. With its user-friendly interface and efficient tag management capabilities, you now have the tools to optimize your digital marketing strategies with precision.
FAQs
What is Google Tag Manager?
Google Tag Manager is a platform that simplifies the management of tracking codes on your website. It eliminates the need for manual code insertion and offers an organized way to deploy various tags. Using Google Tag Manager streamlines tag management, enhances collaboration between teams, and allows you to test and implement tags more efficiently.
How do I create a Google Tag Manager account?
Creating a Google Tag Manager account is straightforward. Visit the Google Tag Manager website, log in with your Google account, and follow the prompts to set up your account. You’ll then create a container for your website or app, which serves as a central hub for managing your tags.
What are tags, triggers, and variables in Google Tag Manager?
Tags are snippets of code that track specific user interactions on your website. Triggers define when tags should fire, such as when a user clicks a button. Variables provide dynamic values that can be used within tags to customize their behavior. Together, tags, triggers, and variables offer precise control over your tracking efforts.
Can I test my tags before deploying them live?
Yes, Google Tag Manager offers a “Preview” mode that allows you to simulate tag firing and observe how tags interact with your website’s elements. This feature helps you identify any issues before deploying tags to your live website, ensuring accurate tracking.
What types of tracking codes can I add using Google Tag Manager?
Google Tag Manager supports a wide range of tags, including Google Analytics, Facebook Pixel, AdWords Conversion Tracking, and more. You can add tags for various purposes, such as measuring website traffic, tracking conversions, and monitoring user interactions.
Recommended Articles Related to Facebook Advertising:
- New Canvas Ad Features: 360 Video and Ad Links
- 3 Instagram Updates You Should Be Expecting
- How To Make a Messenger Destination Ad on Facebook
- Want To Buy Blair Witch Tickets? Go To Facebook
If you liked this article about creating a Google Tag Manager account, comment, like, or share!
